
在上一篇文章中,我们已经讲解了LEMP环境的安装,这篇文章就接着讲Zabbix3.2.1的编译安装过程。
解压zabbix,并进入源码目录:
[root@template ~]# tar xf zabbix-3.2.1.tar.gz
[root@template ~]# cd zabbix-3.2.1/
因为zabbix的SMTP授权认证需要cURL 7.20.0及更高版本,CentOS6默认的curl版本是7.19.7,不满足要求,我们可以继续使用默认版本的curl,但是功能稍微受限,如果要安装新版本的curl,可以用city-fan的curl:
[root@template zabbix-3.2.1]# rpm -ivh http://www.city-fan.org/ftp/contrib/yum-repo/rhel6/x86_64/city-fan.org-release-1-13.rhel6.noarch.rpm
[root@template zabbix-3.2.1]# yum clean all
[root@template zabbix-3.2.1]# yum install libcurl -y
这样,我们就升级完毕curl了,但是,请记住,这种替换默认版本软件的源,有可能会破坏系统的兼容性,并不十分推荐大家这样做。
安装编译zabbix必要的组件:
[root@template zabbix-3.2.1]# yum install OpenIPMI-devel libssh2-devel fping libcurl-devel iksemel-devel net-snmp-devel mysql-devel -y
添加zabbix运行专用的用户:
[root@template zabbix-3.2.1]# useradd -M -s /sbin/nologin zabbix
注意,请不要以root用户运行zabbix!
创建zabbix数据库:
在shell中登录zabbix:
[root@template zabbix-3.2.1]# mysql -uroot -p
在mysql创建相应的数据库:
mysql> create database zabbix character set utf8 collate utf8_bin;
mysql> grant all privileges on zabbix.* to zabbix@localhost identified by 'yourownpasswd';
mysql> quit
注意,密码请设置自己的密码,不要盲目照抄。
cd到mysql脚本目录,然后导入数据库:
[root@template zabbix-3.2.1]# cd database/mysql/
[root@template mysql]# mysql -uzabbix -p<yourownpasswd> zabbix < schema.sql
[root@template mysql]# mysql -uzabbix -p<yourownpasswd> zabbix < images.sql
[root@template mysql]# mysql -uzabbix -p<yourownpasswd> zabbix < data.sql
回到之前的目录,开始configure:
[root@template mysql]# cd -
/root/zabbix-3.2.1
[root@template zabbix-3.2.1]# ./configure --sysconfdir=/etc --enable-server --enable-agent \
> --with-mysql --enable-ipv6 --with-net-snmp --with-libcurl \
> --with-libxml2 --with-ssh2 --with-openipmi
编译安装:
[root@template zabbix-3.2.1]# make install
给zabbix-server和zabbix-agent分别写一个init 启动脚本:
server:
[root@template zabbix-3.2.1]# vim /etc/init.d/zabbix-server
写入如下内容:
#!/bin/sh
#
# chkconfig: - 85 15
# description: Zabbix server daemon
# config: /etc/zabbix/zabbix_server.conf
#

### BEGIN INIT INFO
# Provides: zabbix
# Required-Start: $local_fs $network
# Required-Stop: $local_fs $network
# Default-Start:
# Default-Stop: 0 1 2 3 4 5 6
# Short-Description: Start and stop Zabbix server
# Description: Zabbix server
### END INIT INFO

# Source function library.
. /etc/rc.d/init.d/functions

if [ -x /usr/local/sbin/zabbix_server ]; then
    exec=/usr/local/sbin/zabbix_server
else
    exit 5
fi

prog=${exec##*/}
conf=/etc/zabbix_server.conf
pidfile=$(grep -e "^PidFile=.*$" $conf | cut -d= -f2)
timeout=10

lockfile=/var/lock/subsys/zabbix-server

start()
{
    echo -n $"Starting Zabbix server: "
    daemon $exec -c $conf
    rv=$?
    echo
    [ $rv -eq 0 ] && touch $lockfile
    return $rv
}

stop()
{
    echo -n $"Shutting down Zabbix server: "
    killproc -p $pidfile -d $timeout $prog
    rv=$?
    echo
    [ $rv -eq 0 ] && rm -f $lockfile
    return $rv
}

restart()
{
    stop
    start
}

case "$1" in
    start|stop|restart)
        $1
        ;;
    force-reload)
        restart
        ;;
    status)
        status -p $pidfile $prog
        ;;
    try-restart|condrestart)
        if status $prog >/dev/null ; then
            restart
        fi
        ;;
    reload)
        action $"Service ${0##*/} does not support the reload action: " /bin/false
        exit 3
        ;;
    *)
	echo $"Usage: $0 {start|stop|status|restart|try-restart|force-reload}"
	exit 2
	;;
esac
agent:
[root@template zabbix-3.2.1]# vim /etc/init.d/zabbix-agent
写入以下内容:
#!/bin/sh
#
# chkconfig: - 86 14
# description: Zabbix agent daemon
# processname: zabbix_agentd
# config: /etc/zabbix/zabbix_agentd.conf
#

### BEGIN INIT INFO
# Provides: zabbix-agent
# Required-Start: $local_fs $network
# Required-Stop: $local_fs $network
# Should-Start: zabbix zabbix-proxy
# Should-Stop: zabbix zabbix-proxy
# Default-Start:
# Default-Stop: 0 1 2 3 4 5 6
# Short-Description: Start and stop Zabbix agent
# Description: Zabbix agent
### END INIT INFO

# Source function library.
. /etc/rc.d/init.d/functions

if [ -x /usr/local/sbin/zabbix_agentd ]; then
    exec=/usr/local/sbin/zabbix_agentd
else
    exit 5
fi

prog=${exec##*/}
conf=/etc/zabbix_agentd.conf
pidfile=$(grep -e "^PidFile=.*$" $conf | cut -d= -f2)
timeout=10

lockfile=/var/lock/subsys/zabbix-agent

start()
{
    echo -n $"Starting Zabbix agent: "
    daemon $exec -c $conf
    rv=$?
    echo
    [ $rv -eq 0 ] && touch $lockfile
    return $rv
}

stop()
{
    echo -n $"Shutting down Zabbix agent: "
    killproc -p $pidfile -d $timeout $prog
    rv=$?
    echo
    [ $rv -eq 0 ] && rm -f $lockfile
    return $rv
}

restart()
{
    stop
    start
}

case "$1" in
    start|stop|restart)
        $1
        ;;
    force-reload)
        restart
        ;;
    status)
        status -p $pidfile $prog
        ;;
    try-restart|condrestart)
        if status $prog >/dev/null ; then
            restart
        fi
        ;;
    reload)
        action $"Service ${0##*/} does not support the reload action: " /bin/false
        exit 3
        ;;
    *)
	echo $"Usage: $0 {start|stop|status|restart|try-restart|force-reload}"
	exit 2
	;;
esac
设置下执行权限:
[root@template zabbix-3.2.1]# chmod a+x /etc/init.d/zabbix-agent /etc/init.d/zabbix-server
[root@template zabbix-3.2.1]# semanage fcontext -a -t zabbix_initrc_exec_t /etc/rc.d/init.d/zabbix-server
[root@template zabbix-3.2.1]# restorecon -v /etc/rc.d/init.d/zabbix-server
[root@template zabbix-3.2.1]# semanage fcontext -a -t zabbix_agent_initrc_exec_t /etc/rc.d/init.d/zabbix-agent
[root@template zabbix-3.2.1]# restorecon -v /etc/rc.d/init.d/zabbix-agent
更改下配置文件:
[root@template zabbix-3.2.1]# vim /etc/zabbix_server.conf
把下面几项更改下:
DBHost=localhost
DBPassword=yourownpasswd
PidFile=/tmp/zabbix_server.pid
[root@template zabbix-3.2.1]# vim /etc/zabbix_agentd.conf
更改以下内容:
PidFile=/tmp/zabbix_agentd.pid
更改下执行程序的selinux标签:
[root@template zabbix-3.2.1]# semanage fcontext -a -t zabbix_exec_t /usr/local/sbin/zabbix_server
[root@template zabbix-3.2.1]# restorecon -v /usr/local/sbin/zabbix_server
[root@template zabbix-3.2.1]# semanage fcontext -a -t zabbix_agent_exec_t /usr/local/sbin/zabbix_agentd
[root@template zabbix-3.2.1]# restorecon -v /usr/local/sbin/zabbix_agentd
拷贝zabbix web文件到nginx的document root目录/usr/share/nginx/html,为了便于区分,我们在这个目录专门建个zabbix文件夹
[root@template zabbix-3.2.1]# mkdir /usr/share/nginx/html/zabbix
[root@template zabbix-3.2.1]# cd frontends/php/
[root@template php]# cp -a . /usr/share/nginx/html/zabbix
设置下权限:
[root@template php]# chown -R nginx:nginx /usr/share/nginx/html/zabbix
[root@template php]# semanage fcontext -a -t httpd_sys_rw_content_t "/usr/share/nginx/html/zabbix(/.*)?"
[root@template php]# restorecon -Rv /usr/share/nginx/html/zabbix
iptables设置下,先放行zabbix server的端口:
iptables -I INPUT -p tcp --dport 10051 -j ACCEPT
service iptables save
service iptables restart
启动zabbix server和agent,并加入开机启动:
[root@template zabbix-3.2.1]# service zabbix-server start
Starting Zabbix server:                                    [  OK  ]
[root@template zabbix-3.2.1]# service zabbix-agent start
Starting Zabbix agent:                                     [  OK  ]
[root@template zabbix-3.2.1]# chkconfig zabbix-server on
[root@template zabbix-3.2.1]# chkconfig zabbix-agent on
还要设置个selinux bool值
[root@template tmp]# setsebool -P httpd_can_network_connect 1
[root@template tmp]# setsebool -P httpd_execmem 1
配置zabbix:
从浏览器打开http://192.168.42.15/zabbix/setup.php
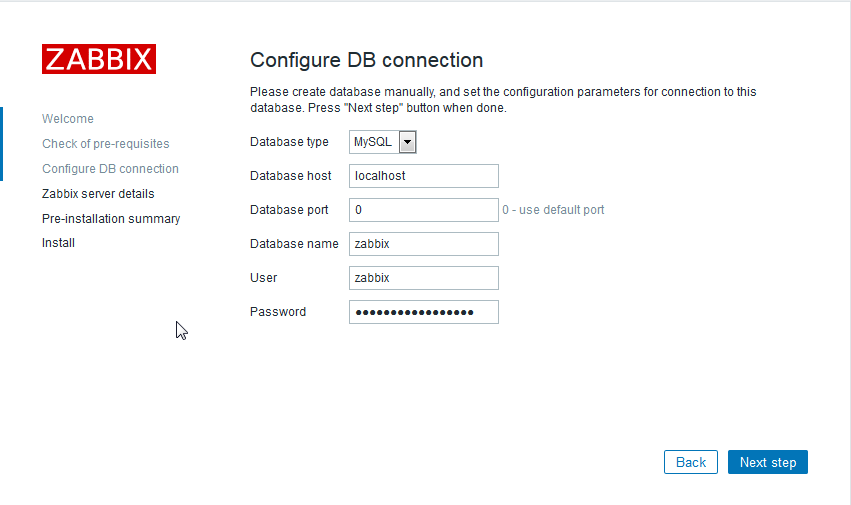
 下一步,输入数据库密码
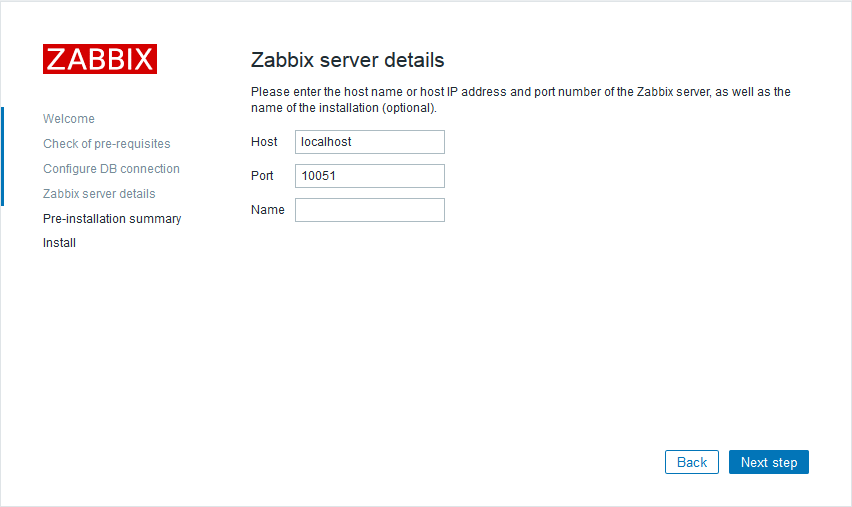
 填写server的相关信息
 默认的用户名是Admin,密码是zabbix,注意,用户名是区分大小写的!
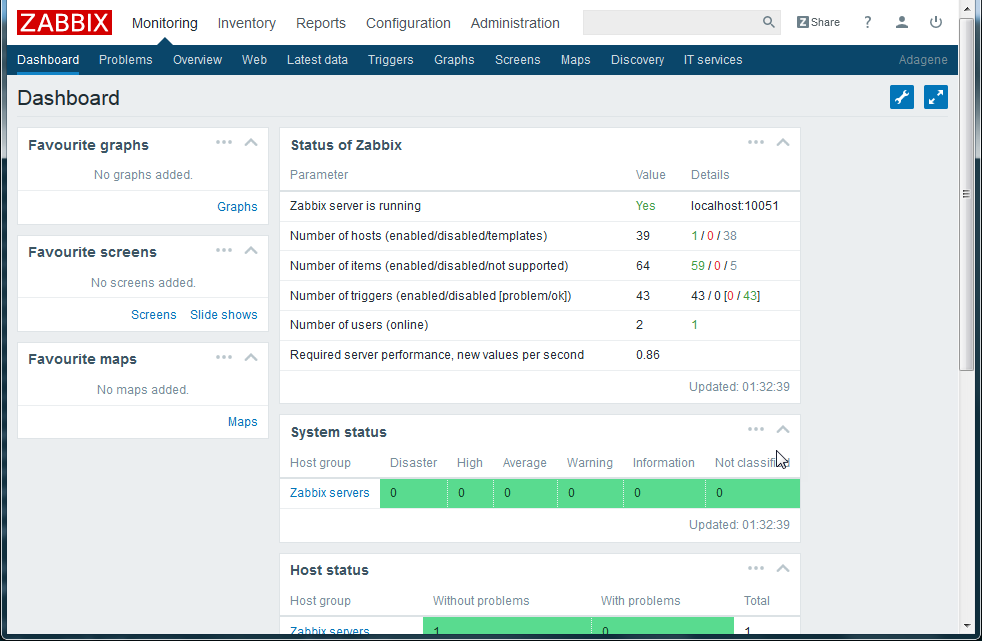
 最后发现登录成功:
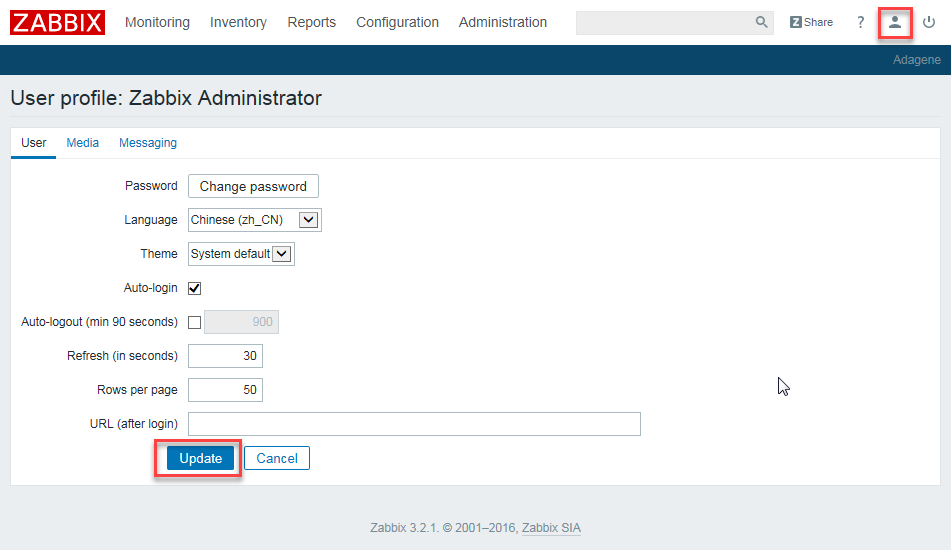
zabbix已经自带简体中文,可以点击右上角的管理员图标更改为中文:
 需要注意的是,zabbix的默认字体,在显示图像时,图像下方的中文字符会乱码,解决方法是提取Windows的雅黑字体文件msyh.ttf上传到
/usr/share/nginx/html/zabbix/fonts/目录,然后编辑/usr/share/nginx/html/zabbix/include/defines.inc.php文件,更改字体配置:
define('ZBX_GRAPH_FONT_NAME',           'msyh');
define('ZBX_FONT_NAME', 'msyh');
一般不需要重启服务,直接就能看到图像的字体不乱码了。
下一篇,我们将介绍让一台服务器,作为客户端连接此zabbix server。